How to use Options to setup different variation for one product
In this tutorial, we will show you how to setup configurable products using Options, in other words, how to use Options to set up different variations of the same product without creating different products. It means that you can set up configurable products in the front end, then user can choose between the different variations available on the product page.
What are Options ?
"Options" in the cart is used to setup multiple products that have minor variation in product attribute, you can have different versions of 1 product.
Lets make it clear with the following case study:
Assume that you would like to provide different colors for the "TShirt" product in your store. And you also want to charge a few extras for the most popular colors. You can accomplish this using the Select option type in opencart. After you've set up the different colors on the admin side, the user is presented with a choice of different colors on the product details page. And yes, the user will be charged based on the color selection.
Option types:
The cart supports many types for Options to make sure it fits any purpose. Here is the list:
- Text and TextArea
- This option type provides a textbox, or TextArea for user to type the required details.
- File Upload
- This type allows user to upload a file for the product
- Date and Time
- This option type is normally used to ask user for a delivery date
- Selection with pre-defined values. This option type gives user different items to choose from. The option type includes 4 different types:
- Select type provides a dropdown box with different options.
- Radio type provides different radio buttons for each option.
- Checkbox provides different checkboxes for each option.
- Image is somewhat similar to the Radio option type, but a user is presented with different images to choose from, instead of just text.
Steps to set up a configurable product
To setup a configurable product, access your store back-end, create a sample product named T-Shirt, add required product information and choose the category. We don't care product details as what we care is the Option tab available in the product edit interface. Lets assume that our Tshirt product is configurable in a way that one can choose color, enter some slogan text, and upload the image. Let's see how to accomplish this using the Options.
Step 1 - Add "Color" Option
From your store back-end, go to Catalog > Options, you would see all existing options. Click on the Insert button to create a new option.
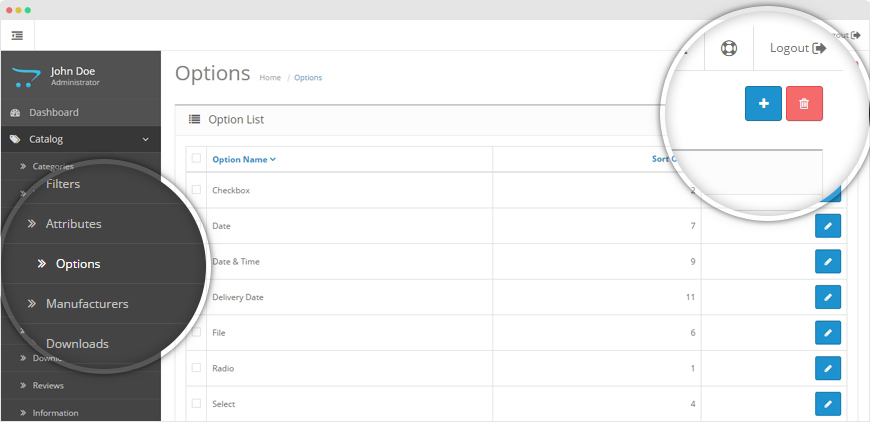
In the option form, please add info for the option, in this case, we want to create color option.
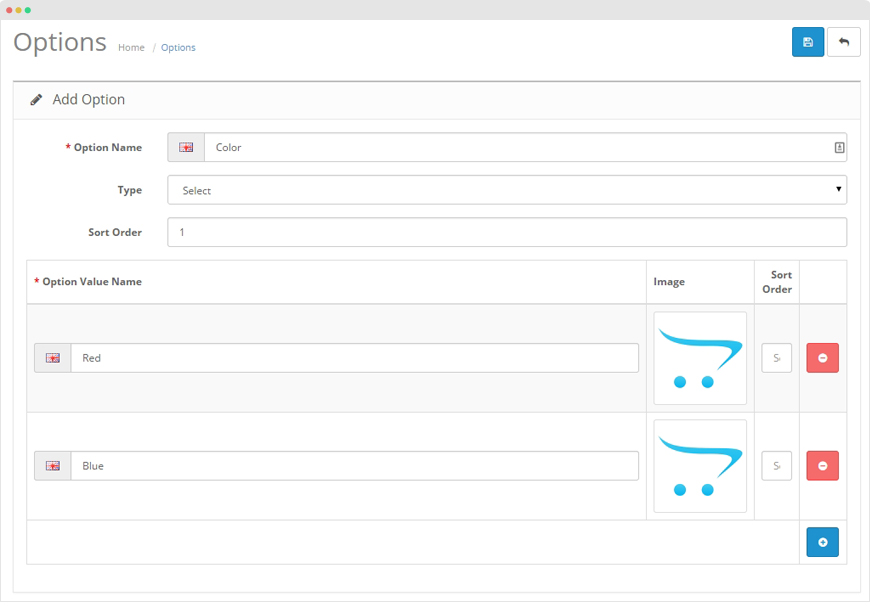
- Option name: title of the option
- Type: select option type
- Sort Order: used to display the different options in a certain order
- Options values: Click on the Add Option Value button to add values for the Color option. In the screenshot, it shows we've entered Red in the Option Value Name. In the same way add two more colors, Blue and Green.
Replicate the step to create more options.
Step 2 - Assign Options to the Product
Open the editing page of product you want to assign option we created in step 1, in this tutorials, we use the "TShirt" product. Go to the Option tab in the product editing interface. On the left-hand side, you'll see the text box, which is auto-complete. If you type "Color", it will show you the "Color" option we added earlier.
Clicking on the Color option in the autocomplete text box will add a new row for color as shown in the screenshot. In that section, you can add different option values which you would like to display for the color option in the front end. Click on Add Option Value to add different color options.

As you can see, I've added three options: Blue, Green, and Red. The other important thing is the Price fields. For each option, you could vary the prices using the +/- sign by the entered amount. Finally, you must specify the Quantity for each type of option, otherwise it won't get displayed in the front-end. So now we've finished with the "Color" option.
Now assign other options in a similar way.
Once done, save the settings. Now, go to front-end to see how the result comes.
Here is the option box of the product, user can select color, add slogan and upload image. You've probably noticed that with each different color it charges extra money, as per our configuration in the back-end!